Using crawler mode for advanced link search
I have already explained the manual search method which is used for cases of unsupported sites. In this tutorial, I will be explaining how to use WFDownloader App's crawler mode (one of the manual search methods). You can access it via Tasks > Add batch download via manual links fetcher > Crawler mode. The crawler mode is an advanced link search mode that can be used to download any kind of file while WFDownloader App crawls the web pages on a website.
You can also watch this recently done crawler mode video tutorial if you prefer that.

Explaining the user interface

The user interface consists of a "Crawl Options" pane. The pane can be folded or expanded by clicking its header/title. The pane contains two sections:
- Result Options: This controls what kind of links you want to get while the application crawls the web pages. You can select any of the available options (i.e, Images, Videos, Audio or Documents). There is also a custom filter, for more filtering of the results. The custom filter will match the result links against the patterns entered and filter result based on the selected mode. Each pattern should be entered on each line. The "R*" button can enable regular expressions mode for the filter.
- Crawl Options: This section controls what kind of pages to crawl. This section is important to how quickly the link search will be completed. You should set it to crawl only the required pages while leaving the others out otherwise the crawl process may take forever. By default, it crawls only site pages and skips external pages. You can further restrict the pages crawled by using its own custom filter which acts in the same way as the one explained above. The "Max crawl depth" indicates how many levels of pages to crawl from the starting crawl page. A value of 0 means the crawler should crawl only the starting page, a value of 1 means the crawler should also crawl all pages directly linked to the starting page, a value of 2 means crawl even one step further from that, etc. So you can see that the maximum crawl depth is not the same as the number of pages crawled, it is much larger. This value set here is important because it ensures that the crawl operation will definitely end when the max depth is reached. Ideally you set the crawl index to match the number of page indexes. For example if a gallery is split into 10 pages, I will set the value to 10. If the site you need to crawl is password-protected, you can use either the "User Login" button to login or even better, import cookies from your browser for the website so that it can use the same access privilege as your browser for the site.
In the image above to the far right, you will notice 4 clickable buttons: save, load, export, and import buttons.
- Save: Use this to save a crawl configuration so that you can reuse it next time. In the process, you can optionally attach it to a website or URL pattern, so that next time you don't have to come here but instead click the blue "Add" button and search straight away! It will automatically reuse your saved configuration. This is useful for sites where you frequently need to download from particular sections (for example galleries).

- Load: Use this to load a crawl configuration that you have previously saved.
- Export: Use this to export one or more forum crawl configurations so that you can share with others. You select the ones you want and then click "Export".
- Import: Use this to import forum crawl configurations from a file. Select the file and then click "Import".
The result section (which consists of the filter area) is below the above mentioned section and works the same way as in the manual search tutorial linked earlier.
A crawl example
Tip: If the example below feels a bit overwhelming to follow, you might prefer to watch this video first which is very beginner friendly, then come back here for more.
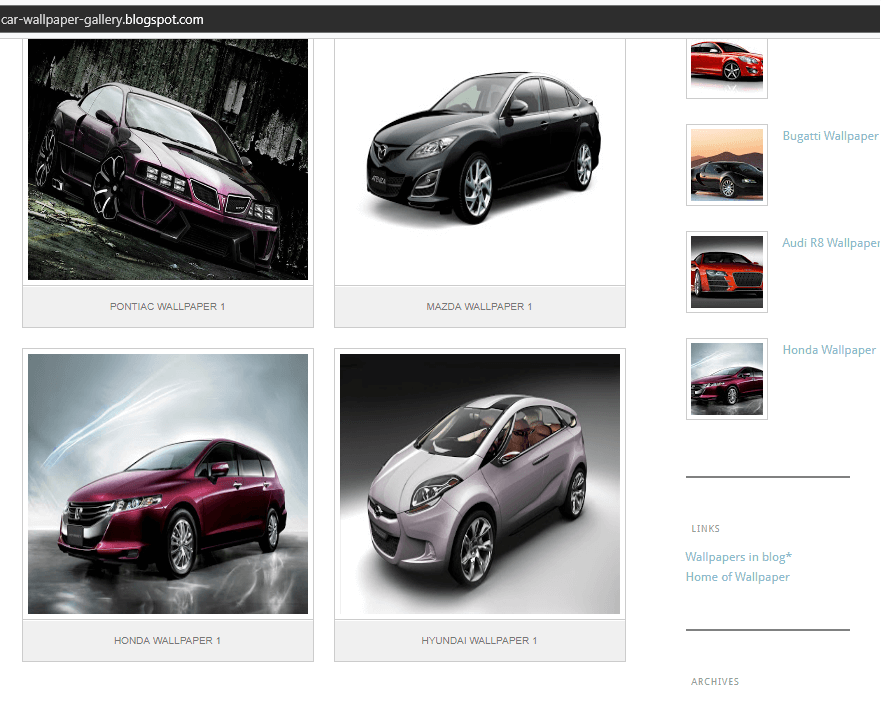
In this tutorial, I will be downloading all car pictures from a car gallery blog. See image of the site below.
Two goals that must be satisfied are the type of links I want and the pages to be crawled.
- Goal 1: I want only images as results, so the "Images" option is the only one selected by me.
- Goal 2: I want to enter each car page, and get the car picture. Note that since the current page only contains a few car pages, I also have to enter/crawl other pages containing listing of cars (i.e. car pages), enter each of their listed car pages, then get their car images too.
To be able to achieve goal 2, you will have to be able to recognize patterns in the links. To see the links each thumbnail/hyperlink is referring to, hover the mouse over any of the thumbnails or links, you will see the actual link at the bottom left or bottom right corner of your browser. See image below.

See sample links from the above page below:
car page 1: http://car-wallpaper-gallery.blogspot.com/2012/12/hyundai-wallpaper-1.html
car page 2: http://car-wallpaper-gallery.blogspot.com/2012/12/honda-wallpaper-1.html
car page 3: http://car-wallpaper-gallery.blogspot.com/2012/12/pontiac-wallpaper-1.html
"Older Posts" 1: http://car-wallpaper-gallery.blogspot.com/search?updated-max=2012-12-23T10:44:00-08:00&max-results=8
"Older Posts" 2: http://car-wallpaper-gallery.blogspot.com/search?updated-max=2012-12-23T08:26:00-08:00&max-results=8&start=8&by-date=false
Tag 1: http://car-wallpaper-gallery.blogspot.com/search/label/Lamborghini
Tag 2: http://car-wallpaper-gallery.blogspot.com/search/label/Bentley
Contact page: http://car-wallpaper-gallery.blogspot.com/p/blog-page_26.html
"Archive page" 1: http://car-wallpaper-gallery.blogspot.com/2012_12_23_archive.html
"Archive page" 2: http://car-wallpaper-gallery.blogspot.com/2012/
The above links have been categorized based on their types. Remember, I want to crawl only car pages and the older posts pages and leave out the rest. The car pages have the ".html" text in common with each other. However the contact and archive pages also have ".html" too so those pages would be crawled too. But notice the "-wallpaper-1.html" is only common to the car pages and that becomes my first filter term. Similarly "search?updated-max" is only common to the older posts pages and that becomes my second filter term. So I'm done with my filters. See image below. Notice that each filter was entered in a new line. I also set the "Max crawl depth" value to 100 which should be enough for the small website.

After entering the crawl settings like above, click "Search" to begin the link search operation.
From the image below, we see a total of 144 links found. Click the confirm button to add them as a batch.

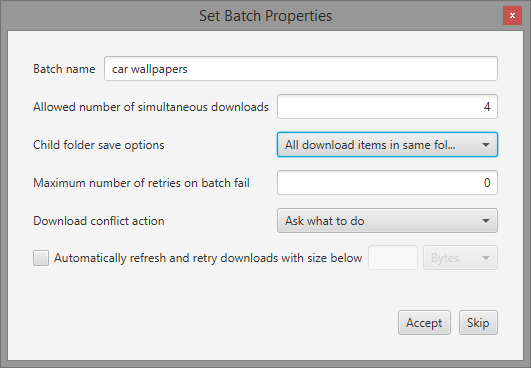
Now enter a name for the batch and other preference settings you want. I have selected the "All download items in same folder" option because I don't want the images in separate sub-folders (which is the default). Note that you will not see this option unless you have unselected the "Skip pre-batch creation step" option from the general settings (under options menu).
Once the batch has been added you can click the "Start" button to begin the downloads and that's all. Since a crawl operation can take very long, and there is no way to determine how long it will take, you do not have to wait for it to complete. Just click "Confirm" while the search is in progress and the batch will be automatically added when the search is over and automatically started too!
Some crawling tips
- You are advised to crawl only the pages you need and not just crawl every page. The link search will end faster, your device won't have to be working for too long and you are less likely to get blocked by the site owner, which can be permanent in some cases causing you to lose access to the site. So take the time to set the crawl filter.
- You should save the crawl settings you use often so that the next time, all you have to do is to load them.
- You should leave the "Fast mode" option selected. If selected, the crawler will use the file extension to determine the file type. Unselecting it will drastically slow down the search because every candidate result will be connected to. You should only unselect the option when the website you are trying to download from doesn't make the file type obvious from the link. For example, a site can have an image link http://abc.com/image.png while another might have an image link of http://xyz.com/file. In the second one it isn't obvious that the file is an image, and is a good case to unselect the option.
- For the custom filters, you should prefer the "Only links matching" filter option to the "Exclude links matching" option as the latter option is less restrictive and you may end up crawling pages you didn't expect making the search to take much longer.
- If the crawler is not finding the links you expect, try selecting "Thorough page scan" before retrying again.
Note that in the example given in this tutorial, the website was fairly easy so I just used keywords in the links/URLs to filter the pages crawled. For other sites you may need to use regular expressions which is an efficient way to create patterns to be matched. You can turn on regular expressions mode for the custom filter box by toggling on the "R*" button.
Finally, we have explored how to use the crawler search mode. If you encounter any bugs while using it or want to suggest improvements, please contact support. If it worked well for you, why not recommend this tool or share with others by clicking any of the share buttons below. Thanks for reading!
You may also like:
- Using manual search option to download from unsupported sites
- How to bulk download images, videos, documents and other media from forum threads